HDiag Pro
Hardware Overview
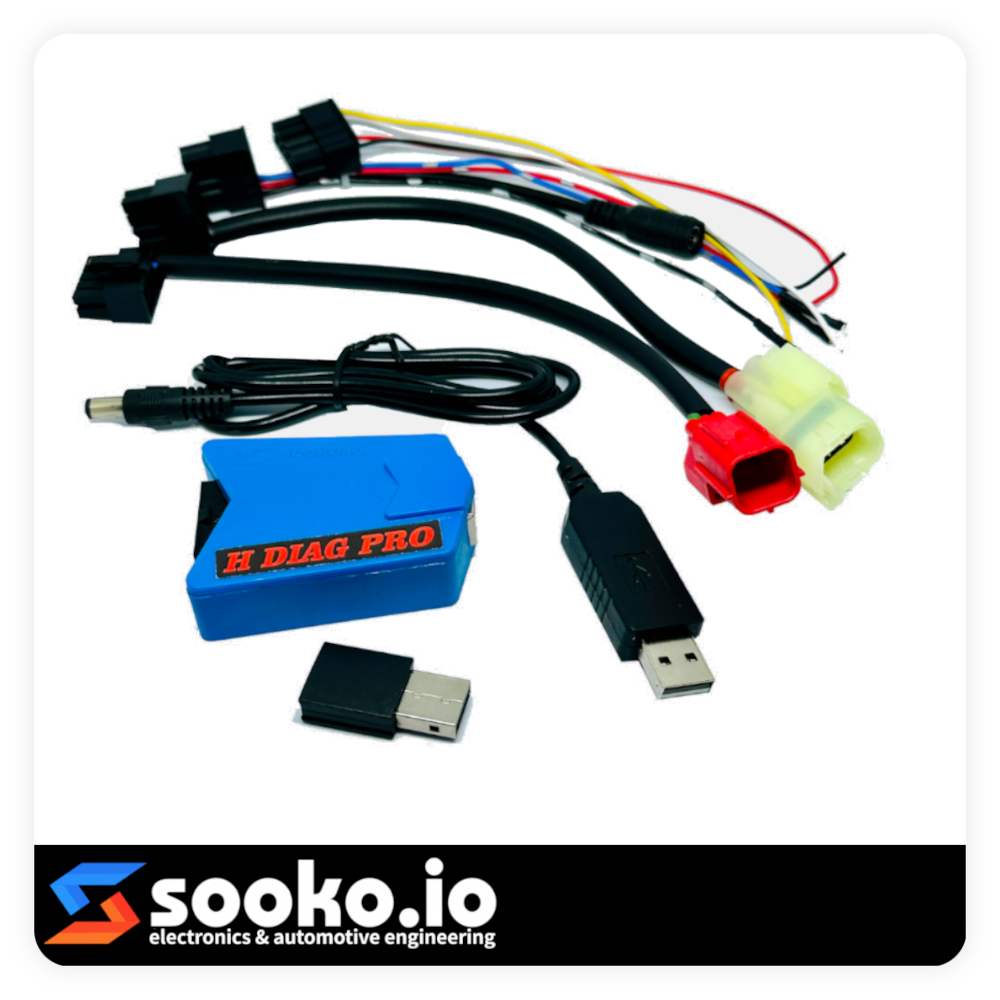
HDiagPro Hardware
BLE Dongle
DLC Connector
Euro 5 DLC Connector
12 volt Adaptor
3-wire connector for direct communication with the ECM
Backdor kit
USB Cable
Software Overview
Auto Detect Vehicle Model
Tune Manager
Write Flash
Read Flash
2D and 3D Graph Visualisation
Interactive Table
Real Time Data Monitoring
ECM Recovery(K-line and Backdor)
Diagnostic
Verified by google play project (Android App)
Free update vehicle files
no need internet connection for daily use
The software license is free, you are allowed to install on multiple laptops
Tune Menu
Iginition
Fuel
Limiters
Disabling Sensor Fault
Disabling Immobiilizer
Get Started
- Prepare the Hardware:
Plug the HDiagPro Hardware into the DLC (Data Link Connector) of the motorcycle.
Plug the BLE (Bluetooth Low Energy) Dongle into a USB port on your PC/laptop.
- Power On the Motorcycle:
Turn ON the motorcycle’s ignition switch.
- Open the Software:
To open the software, simply click the “HDiagPro” icon on your desktop.
- Connect to ECM:
Look for a button Connect to ECM and press it.
the Tune Menu will automatically open according to the type of ECM (Engine Control Module)
- Edit Maps:
Maps are specific parameters that control various aspects of the engine’s performance, such as fuel delivery, ignition timing, rpm limiters, etc.
Make any necessary edits to these maps to adjust the engine’s performance. This process requires a good understanding of engine tuning principles.
- Flash the ECM:
After making the desired changes, Press the Flash button to send the edited maps from the software to the motorcycle’s ECM.
- Wait for Flashing to Complete:
During the flashing process, the software will communicate with the ECM and write the edited maps into the ECM’s memory.
Wait for the “Write Flash Completed” message.
- Reset the Motorcycle Switch:
Once the flashing process is complete, turn OFF the motorcycle’s ignition switch and then turn it back ON. This effectively resets the ECM and allows it to recognize the new maps.
- Monitor Data in Real-time:
With the motorcycle running and the ECM updated with the edited maps, you can use the software to monitor real-time data from the ECM.
Press the Play button to to start real-time data monitoring and observe the changes after editing.
Performing Table Editing
📝 Set Value
↕️ Liniar Horizon
↔️ Liniar Vertical
🔼 Increase
🔽 Decrease
🔄 Refresh Color
📑 copy
📖 paste
Update and Upgrade
- Update Maps
Right-click Hdiag Pro icon on the desktop and choose “Run as Administrator.”
Click on Update from the menu bar, and then select Update Maps
Choose your region from the available options.
Select the type of maps you want to update.
Press Check Update to check for available updates.
Once the download process is completed, click on Upgrade
Finally, restart your ECM Manager and verify your new maps in the Database menu.
- Update Software
Right-click Hdiag Pro icon on the dekstop and run as administrator
Click Update from menu bar and select Update Software
Press Check Update to check for available updates.
After the download process is completed, click on Upgrade
- Update HDiag Pro Firmware
Open the Hdiag Pro software on your laptop.
Plug your Hdiag Pro into your laptop using a USB Cable.
Click on Update from the menu bar and select Update Firmware”
Press Check Update to check for available firmware updates.
After the download process is completed, click on Upgrade and wait until the update process is finished.
- Update Ble Dongle Firmware
Open the Hdiag Pro software on your laptop.
Plug Your BLE dongle to your laptop
Click on Update from the menu bar and select Update Firmware”
Press Check Update to check for available firmware updates.
After the download process is completed, click on Upgrade and wait until the update process is finished.
ECM Recovery
If a failure occurs during the flashing process, such as accidentally turning off the ignition or having a weak battery condition, it can result in an incomplete flash and cause issues with the motorcycle’s performance. Ensure a stable power supply, avoid interruptions, and follow these instructions to troubleshoot the problem!
HDiag Pro Hardware remains connected to the motorcycle’s, or to ECM directly through the K-LINE pin.
The Bluetooth Dongle stays connected to the Laptop.
Open the software and click on the Connect to ECM button.
The software will display a Pop Up “Recovery mode detected” .
Press “Yes.
The software will automatically enter the recovery menu.
If a Pop Up appears with a choice of ECU Part Numbers, select the appropriate Part Number.
Press the Flash button and wait for the Flashing process to complete.
Connecting to Android Phone
Integrating with Wide Band AFR Meter (WBo2)
Plug the BLE Dongle into the laptop.
Ensure that the BLE dongle firmware is up to date.
Open the software and go to Menu Bar > Tools > BLE Connection > Add New.
Power ON the AFR Meter Module:
Connect the RED cable to the Positive terminal.
Connect the BLACK cable to the Negative terminal.
Alternatively, you can use a 12-volt adapter.
Press the Scan Device button in the software and wait for the AFR METER DEVICE to be found.
Click the Pair to Device button to initiate the pairing process and observe successful pairing.
If thePair to Devicebutton doesn't appear, please unplug and plug back the BLE dongle
Power OFF the AFR Module.
Replug the BLE Dongle, Power ON the HDiagPro and AFR Meter, and reopen the software.
the icon WBo2 in the upper right corner is a sign that the AFR meter is already connected
The AFR (Air-Fuel Ratio) values will be displayed in a table, following the pointer based on the RPM and TPS (Throttle Position Sensor) coordinates.